
Poof! You’re a gambeson!
No, not quite like that. Rather, my spouse has lately decided to seriously begin learning SCA heavy armored combat. He’s currently working around a shoulder injury, but he is pretty sure this is an activity he wants to pursue long term. The group we’re in has loaner armor, but he’s been wearing a sweatshirt (sometimes MY sweatshirt) and some pants under it. I decided that I would get him started collecting his own kit by making him a gambeson. So he could leave my sweatshirts alone.

Resources
For this project, historical accuracy was less important than finding a pattern that I could easily create to fit him and that would fit my barely-more-than-rudimentary sewing skills. I found an Instructable by (username) Rune Cutter, entitled “How to Make an 11 Cent. Padded Gambeson.” That is, 11th Century, not the amount of money you will spend on this project. The step-by-step instructions seemed pretty clear, so I took into account the warning that you needed some basic sewing skills, and decided to try it.

The Progress
Everything I needed for this project was available at Joann’s. I purchased several yards of quilted cotton, four packages of bias tape (only needed two), and some green thread to match. I already had pins, pens, rulers, etc. I bought heavy-duty needles for my sewing machine, but ended up not needing them.
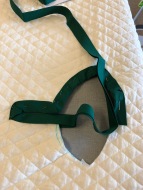 Where I Followed the Instructions. I used Rune Cutter’s sketched pattern and dimensions to make the neck. The pattern is scaled for a 5’10” fighter; my spouse is 5’9″, but built like the tanks he used to command. I took Cutter’s advice and double-checked my pattern before cutting it out. I also used the general pattern shape, sleeve extensions, and the idea of using bias tape around the neck, sleeve ends and bottom of the gambeson. I found his instructions to be clear and understandable.
Where I Varied A Bit. This is how I double-checked the pattern. While the sketch shows some general measurements, I needed to take four more in order to get it sketched  properly: my spouse’s waist, chest, arm scye and forearm. I added two inches of ease to the chest and waist, and probably could have added one more. After finishing the neckline, to include sewing the bias tape to finish the edge, I then pinned along the lines I drew on the cloth. This allowed me to get him to try it on before I started sewing. If you’re doing this for someone other than your spouse, you could try basting it so you don’t stick them with a pin. Or not.
My sewing machine was packed away, so I started sewing the seam by hand. I don’t know why. I was just too lazy to pull the sewing machine out. That got old pretty quickly, so the next day, I got the sewing machine from its closet, threaded it up, and sewed the seam. Keep in mind, I hadn’t yet cut the fabric. I had my spouse try it on one more time, then I cut a quarter inch seam around the top layer and a half inch seam around the bottom layer. This allowed me to flat-fell the seams, which I did by hand. Some of the cotton was fraying even a short time after cutting, and the quilting was fluffing out, so finishing the seam this way seemed like a good idea.
One note–if you do the sleeve extensions in the Instructable, don’t forget to leave yourself a seam allowance. Like I did. Ugh. Re-cut. And this fabric is not cheap. I think I’m going to make a cowl out of the mistake.
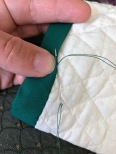 Also, I think I got away with not needing the heavy duty needles because I didn’t stitch the bias tape over the fabric, except for the bottom where I sewed along the inside seam and then handstitched it down on the outside. This is how I’ve finished most of the quilts I’ve made, and this was a similar process.
Would I Make it Again?
Probably. This was a fairly easy project, and I would be happy to make one for a friend, as long as they bought the fabric for it. I might try tackling a more involved gambeson later, but for now, this will get him started. He hasn’t yet had a chance to fight in it–nursing a shoulder injury–but I’m looking forward to finding out how it feels when he’s moving in it, how it breathes, and how long it holds up after a few months of weekly practices. I’ll let you know!

